Table of Contents
Whether you're selling apparel, shoes, or accessories, adding a size chart to your Shopify store is essential for reducing returns and boosting customer confidence. This guide walks you through three proven methods to add size charts to your products - from simple standalone pages to advanced app solutions like Sizely.
1. Why Adding a Size Chart in Shopify Boosts Sales and Cuts Returns
Shoppers are far more likely to buy (and keep) their purchase when they know it will fit.
A clear Shopify size guide gives customers the confidence to click Add to Cart instead of second-guessing.
Reduce Returns and Exchanges
Sizing confusion is one of the top reasons for online returns. In fact, 30-40% of all e-commerce returns are due to size or fit issues, especially in apparel and footwear. When you add a size chart in Shopify, you give buyers the exact measurements they need, which means fewer costly returns and less time spent handling exchanges.
Increase Conversions
A well-placed size chart can lift conversion rates. Customers who can instantly check their measurements are more likely to complete checkout instead of abandoning their cart to “think about it.”
Build Trust and Professionalism
Professional product pages signal that you care about fit and customer experience. Whether you create a simple page or use Shopify size chart metafields for product-specific guides, you show that accuracy matters to your brand.
Improve the Mobile Shopping Experience
More than half of e-commerce traffic now comes from mobile devices. A mobile-friendly size guide (whether a popup or an inline table) lets shoppers get the info they need without pinching and zooming.
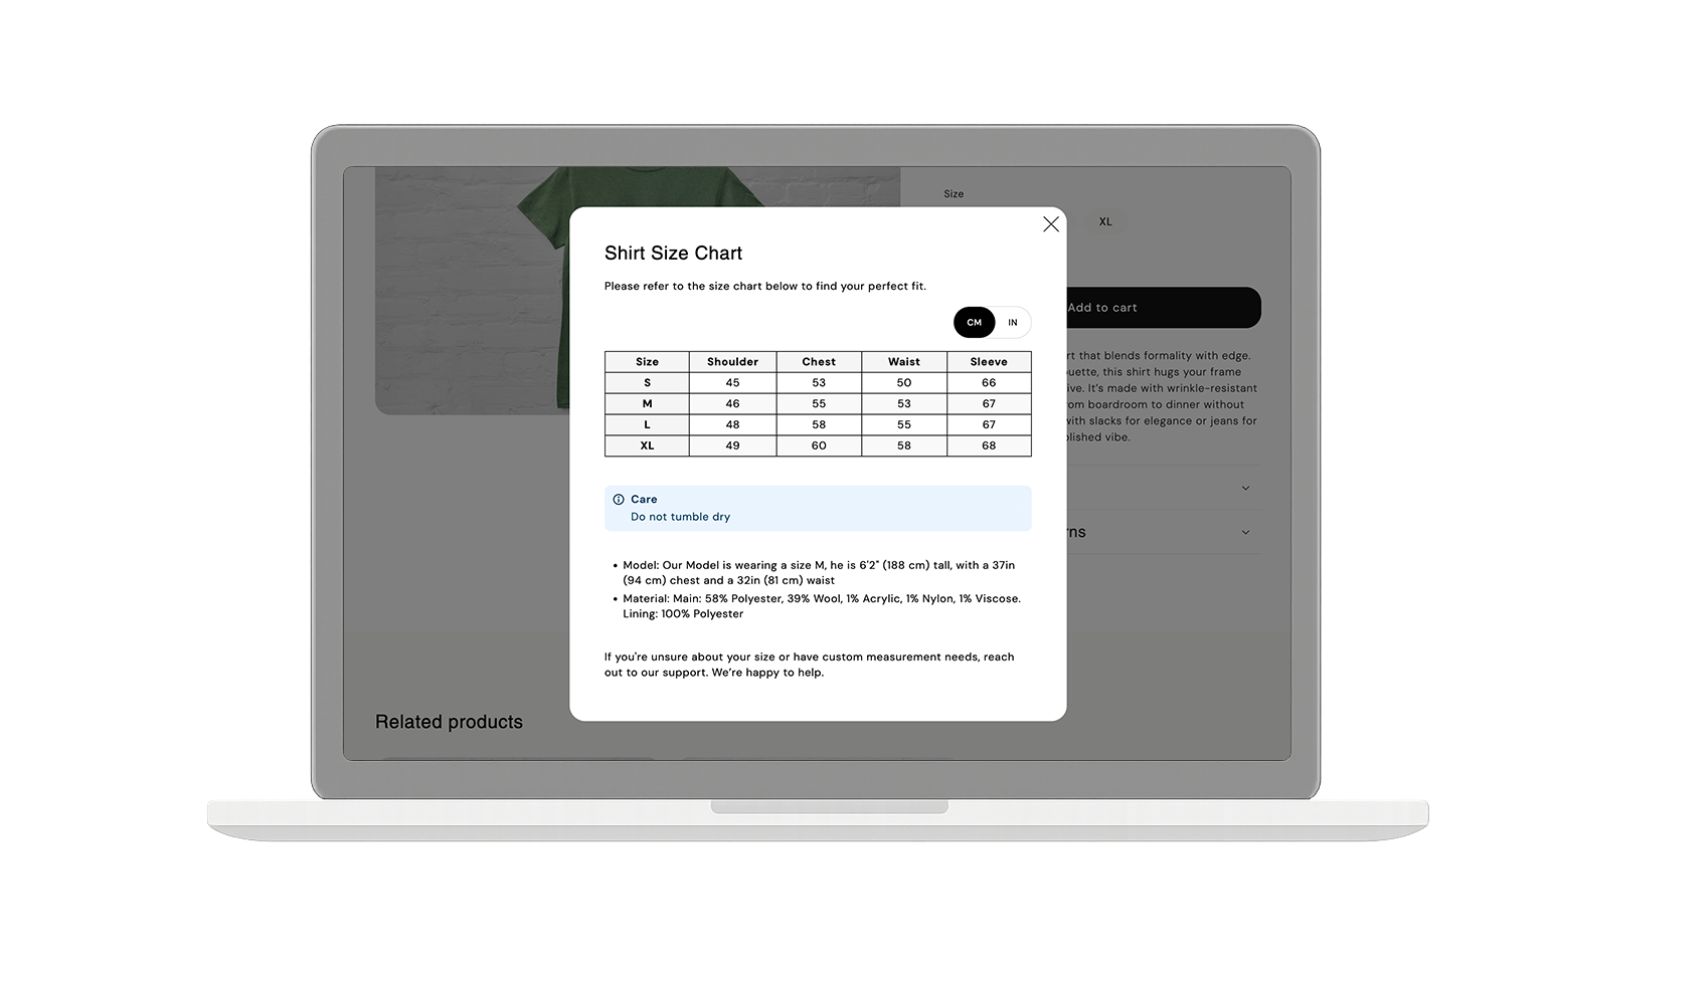
2. Create a Standalone Size Chart Page in Shopify
A simple Shopify size guide page is the quickest way to provide product sizing information. This method works well if you only have one chart for all products or want a basic setup without apps or coding.
Why Use a Standalone Page?
- Quick to set up and free.
- Works for all products if your sizing is consistent.
- Easy to update at any time.
Step-by-Step Instructions
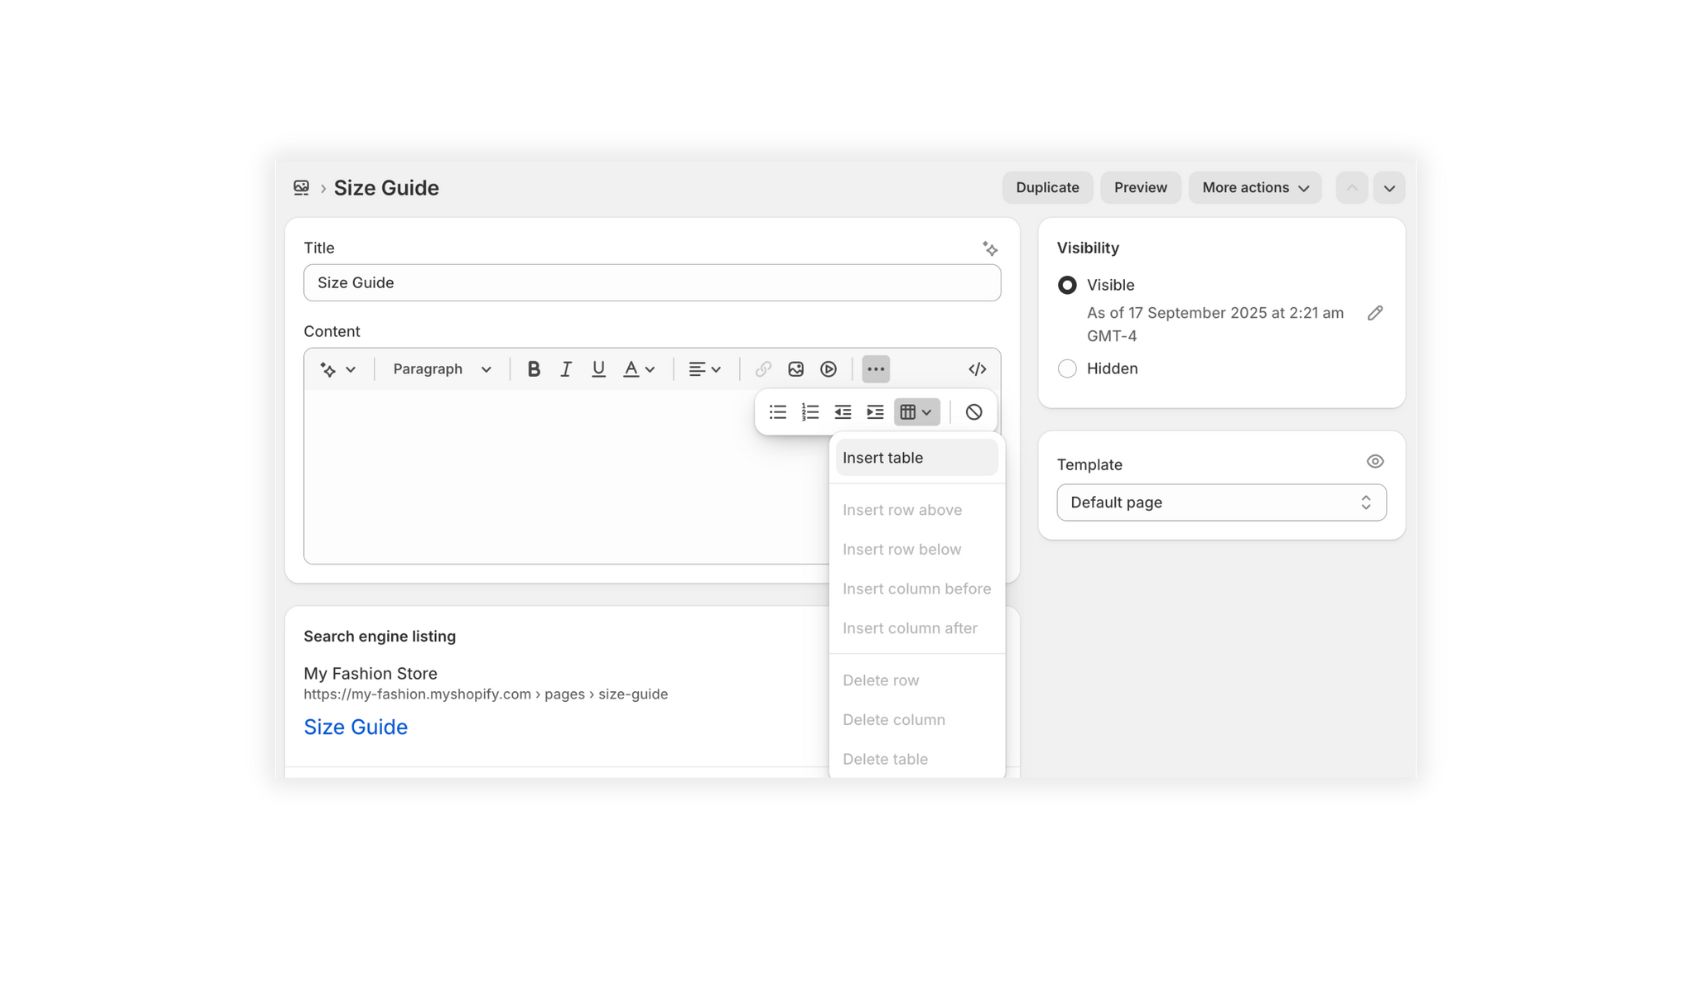
Step 1: Go to the Shopify Admin
Navigate to Online Store → Pages → Add Page.
Step 2: Name Your Page
Use a clear title like Size Guide or Size Chart.
Step 3: Add Your Size Chart
- Click Insert Table from the rich text editor. Here you can quickly add rows and columns, or delete table data as needed.
- Add supporting text where necessary, such as instructions for measuring or notes about fit.
- Include images or diagrams to make the chart visually clear. These visuals help customers understand measurements quickly.
- Include both inches and centimeters if you serve international customers.
Step 4: Link the Page in Navigation
Go to Online Store → Navigation, and add your new page to your main menu or footer for easy access.
Pros and Cons
| Pros | Cons |
|---|---|
| Quick and free | Not product-specific |
| Easy to update | Customers must leave product pages to see it |
| Works for all products | Limited design options without custom code |
Best Practices
- Keep the chart clear and mobile-friendly.
- Add a link from product pages, so customers can quickly check sizes.
- Use bold headings, text explanations, and visuals to make the chart easy to scan.
3. Add a Size Chart with Shopify Metafields and Theme Customization
If you want product-specific size charts or more control without using an app, Shopify’s metafields are a powerful solution. This method lets you attach unique size charts to each product and display them directly on product pages.
Why Use Metafields?
- Display different charts for different products or collections.
- Keep your product pages clean and organized.
- No need for external apps if you’re comfortable with minor theme customizations.
Step-by-Step Instructions
Step 1: Create a Product Metafield
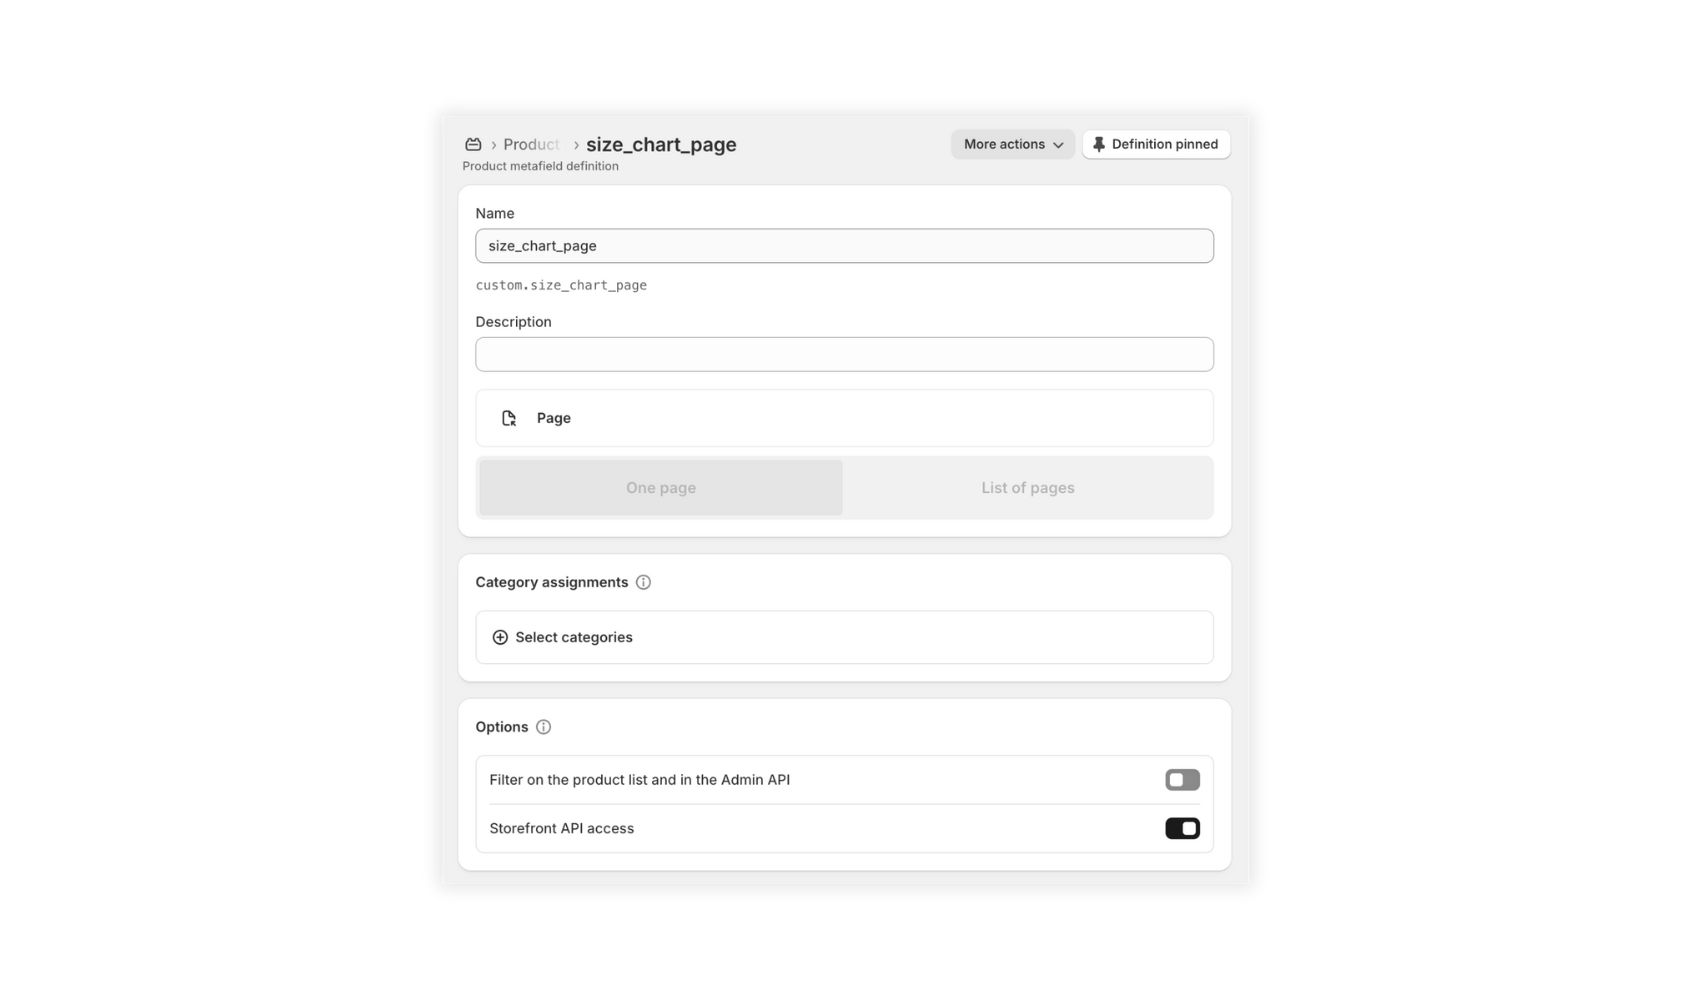
- Navigate to Settings → Metafields and Metaobjects → Products.
- Click Add Definition.
- Enter a name for your metafield, such as size_chart or size_chart_page.
- For Type, select Page → One Page. This allows you to link a standalone size chart page to each product.
- Save the metafield definition.
Step 2: Update Your Theme to Display the Metafield
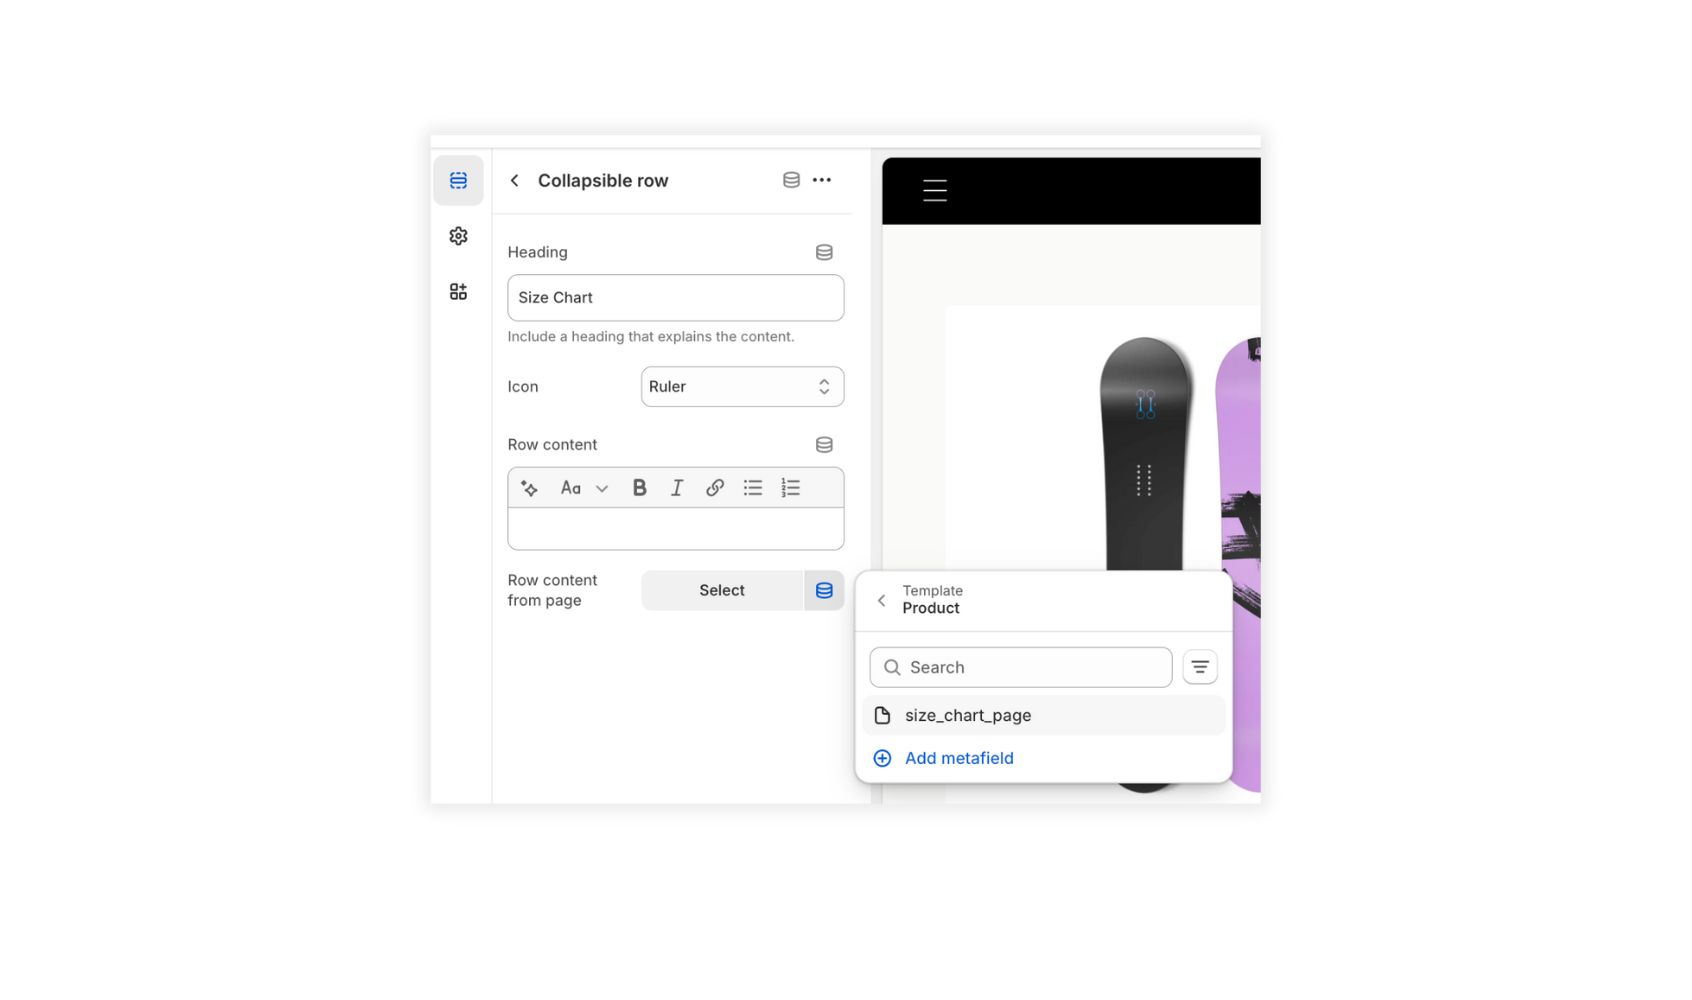
- Go to Online Store → Themes → Customize → Product template (usually Default product).
- Insert a new section or block. A collapsible row works well.
- Set the block’s "Row content from page" to your Size Chart Page metafield:
- Click the database icon to pull data from a dynamic source (our metafield), choose the metafield by its name, then Save.
Step 3: Create and Link Size Chart Pages

- In Online Store → Pages, create a page for each chart and add your table/text/images.
- Open each product, scroll to Metafields, and link the correct Size Chart Page you just created.
Pros and Cons
| Pros | Cons |
|---|---|
| Product-specific size charts | Requires minor theme customization |
| Clean and flexible | Slight learning curve if unfamiliar with metafields |
| No app cost | Charts must be added manually per product |
Best Practices
- Keep consistent styling across products.
- Make charts mobile-friendly and readable.
- Include supporting text or images to guide customers.
4. Use a Shopify App Like Sizely
If you'd rather skip manual metafields and theme edits, a Shopify app is the fastest, most flexible way to add size charts. Apps can provide reusable templates, advanced styling options, detailed analytics on chart usage, and an easy way to manage large product catalogs.
Why Use an App
- No coding required - perfect for non-technical store owners.
- Centralized management - update one chart and it changes everywhere it’s used.
- Extra features such as analytics, design presets, or auto-assigning charts by product type
Step-by-Step Example: Using Sizely
Step 1: Install the App
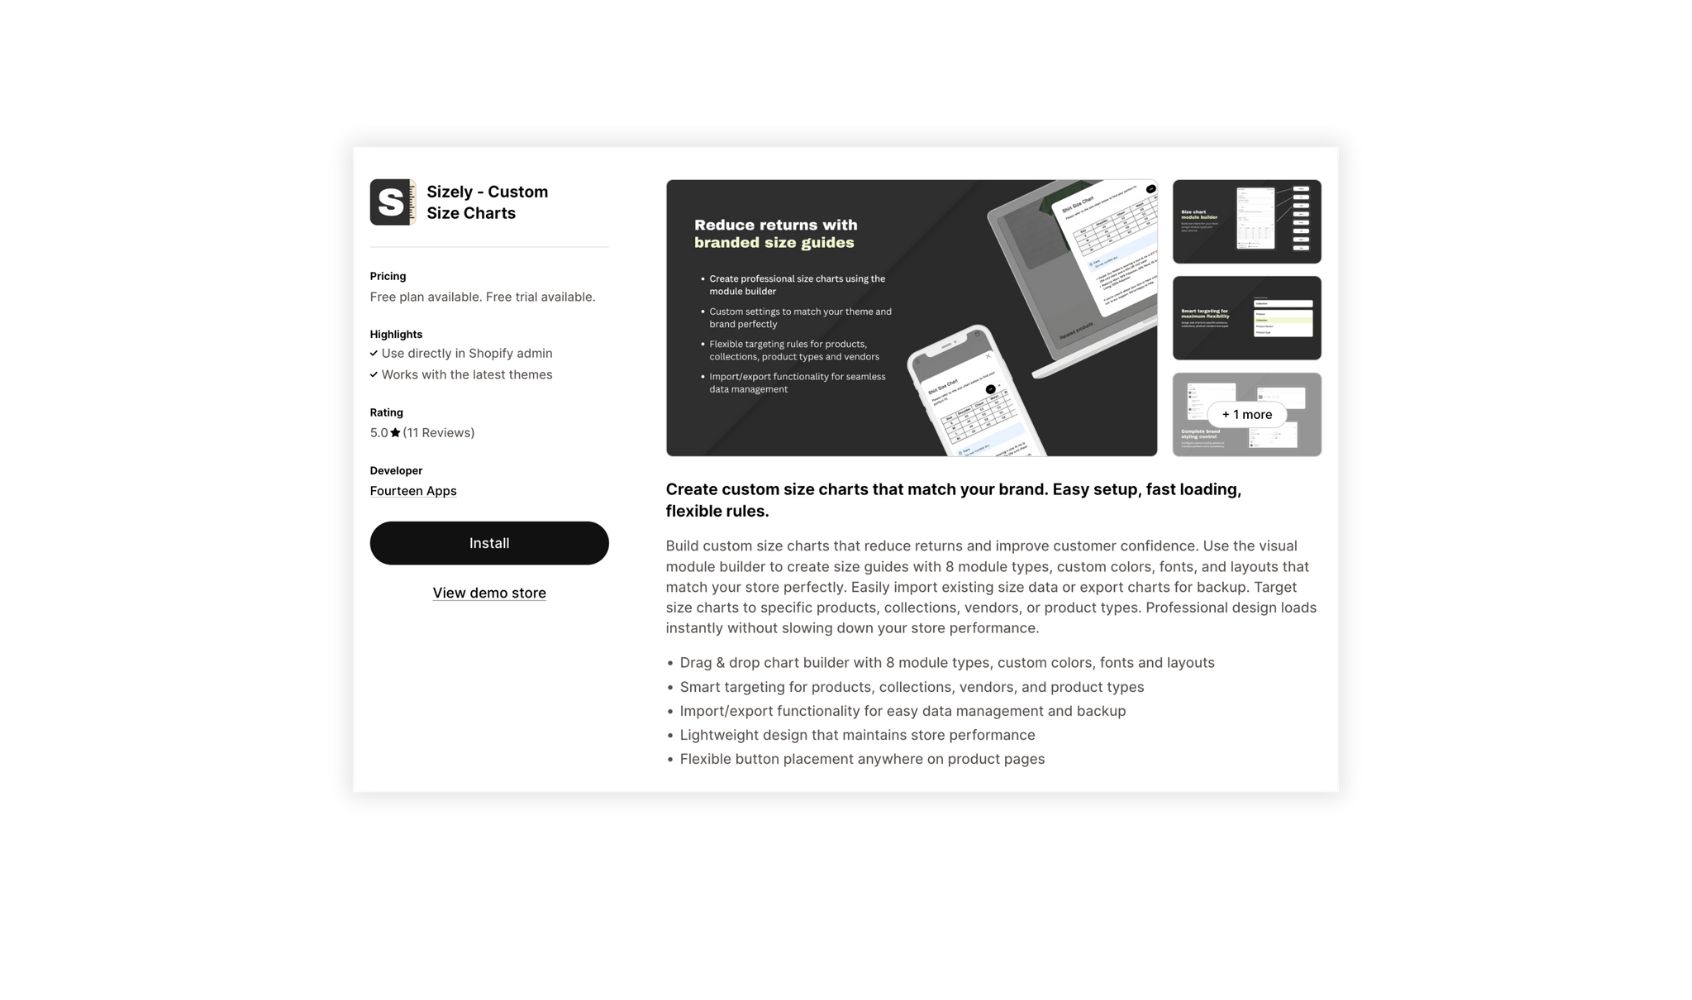
- From your Shopify admin, go to Apps → Shopify App Store and search for “Sizely” (or the app of your choice).
- Click the Install button to add the app to your store.
Step 2: Create a Size Chart
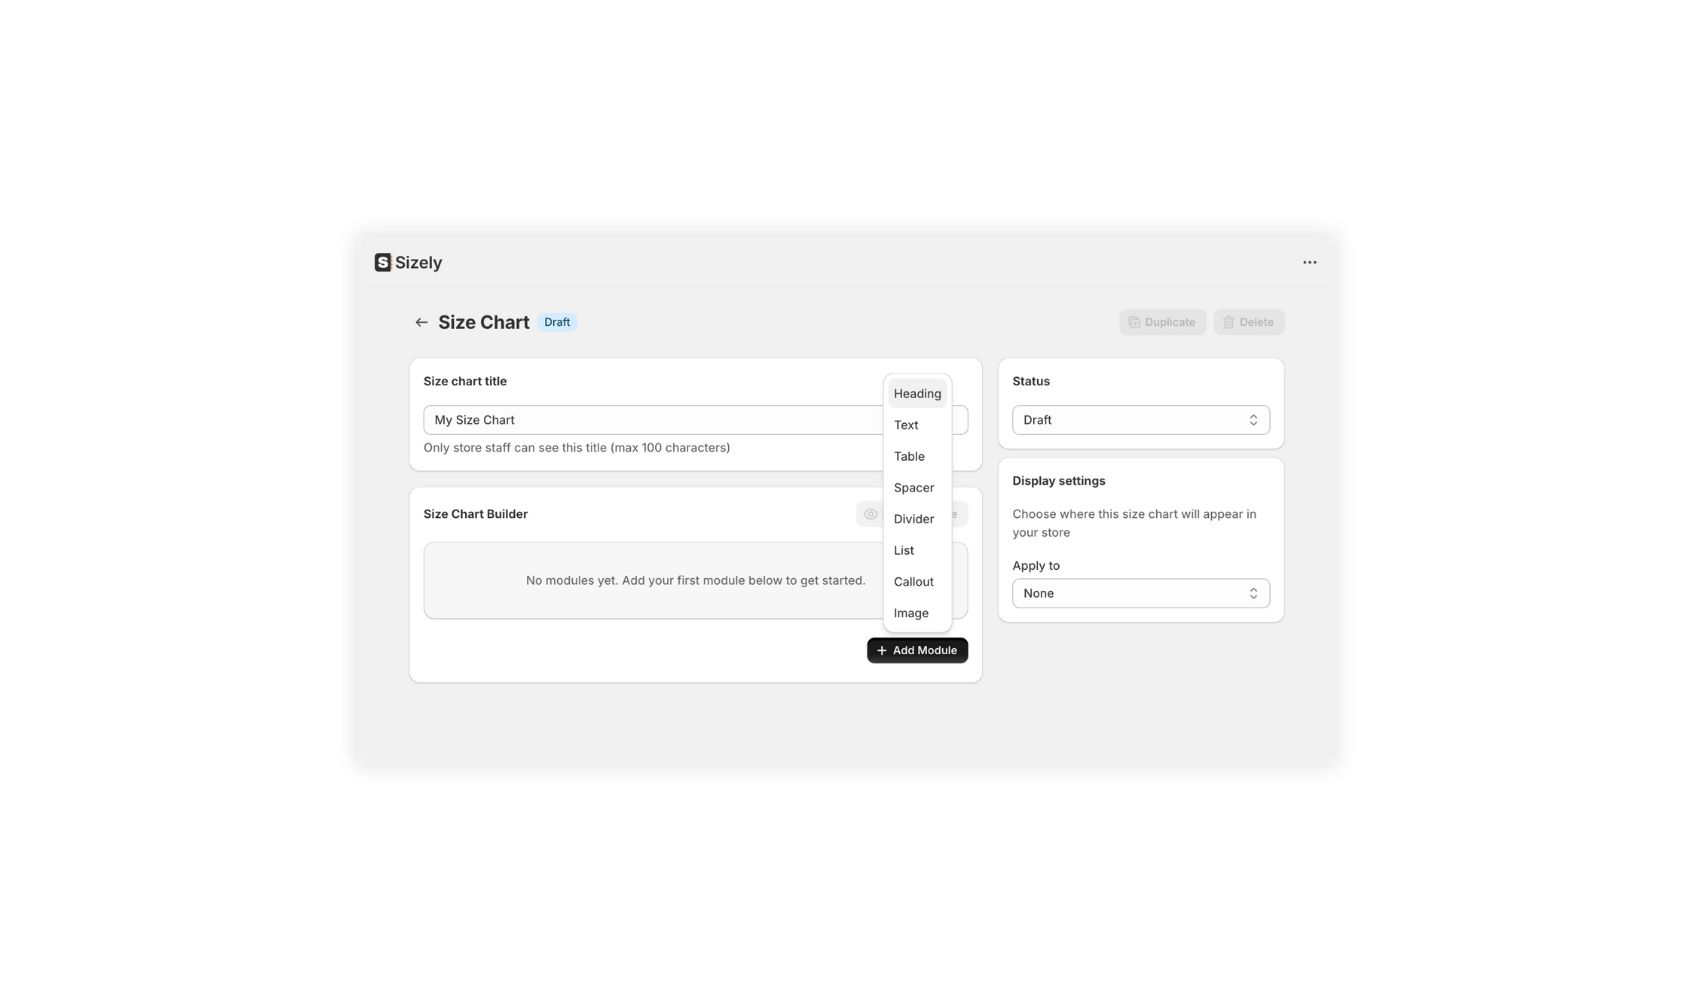
- Open the app and click the Create size chart button.
- Use the drag-and-drop builder to arrange content quickly.
- Choose from eight module types - including text blocks, tables, images, and more.
- Add measurements, supporting text, and product photos as needed.
- Check your work in Preview mode to see exactly how the chart will appear on your storefront before publishing.
Step 3: Set Display Settings to Assign the Chart
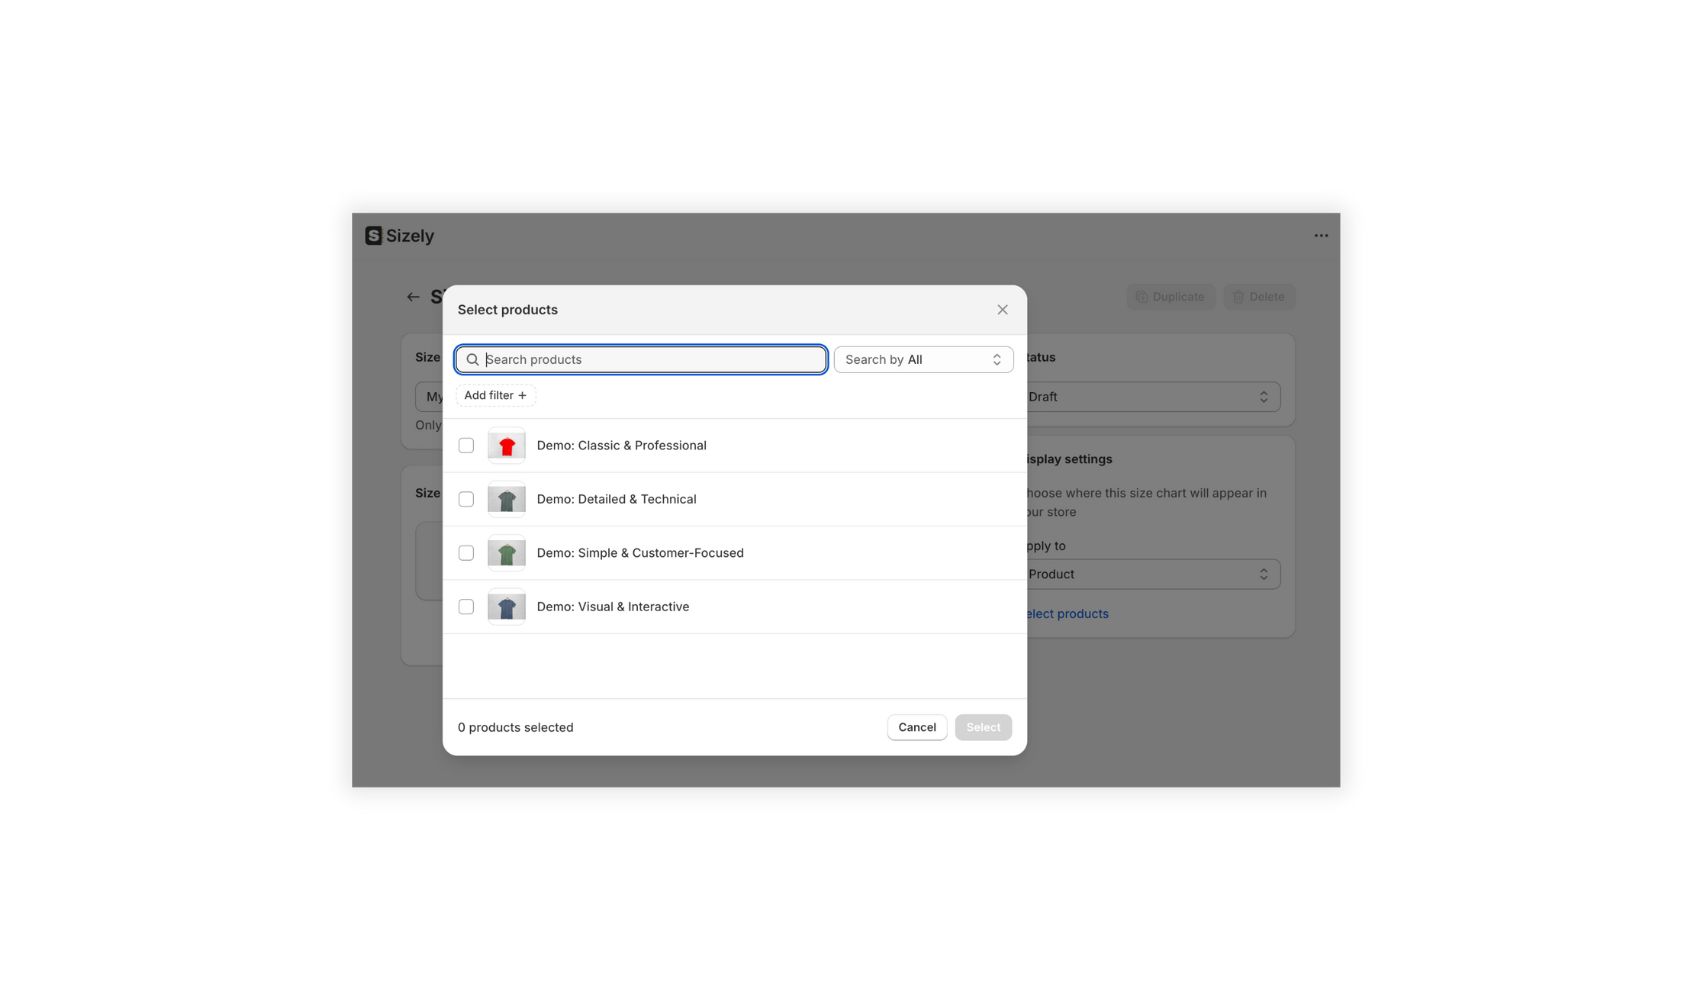
- In the size charts Display Settings, assign the chart to single or multiple products, entire collections, product types, or vendors.
- This ensures the correct size chart automatically appears wherever needed.
Step 4: Customize the settings and style
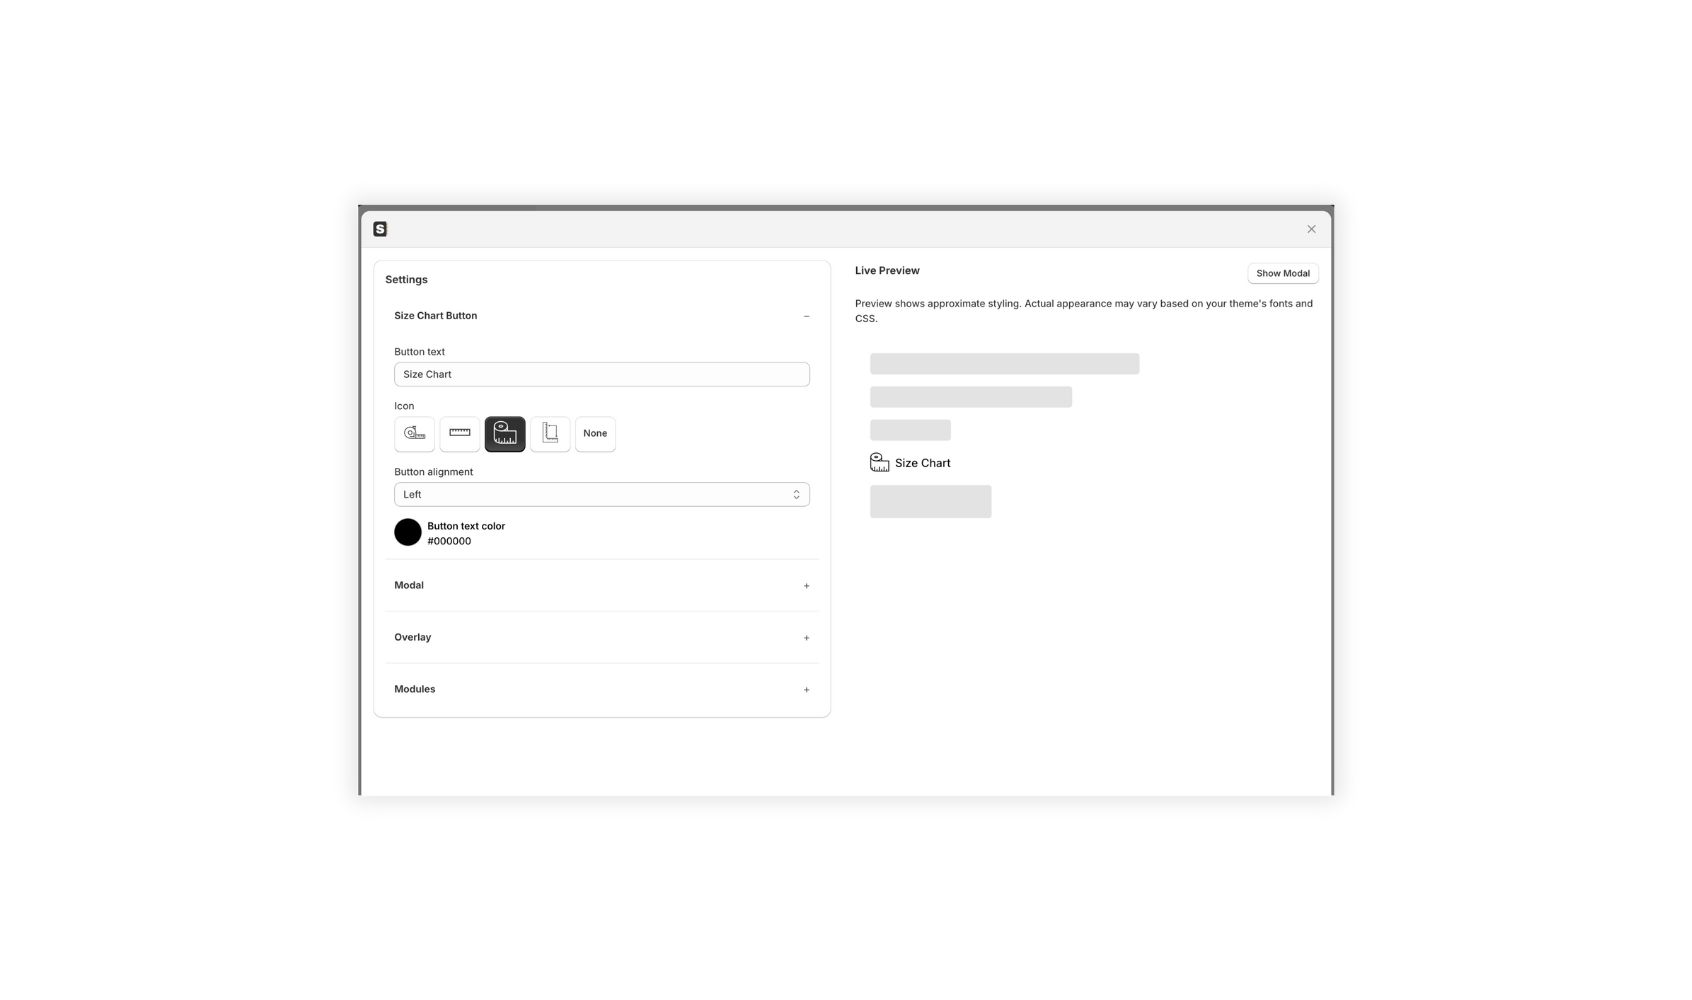
- Adjust colors, typography, spacing, and button styles so the chart matches the look, style, and branding of your store.
Step 5: Add the app block and view
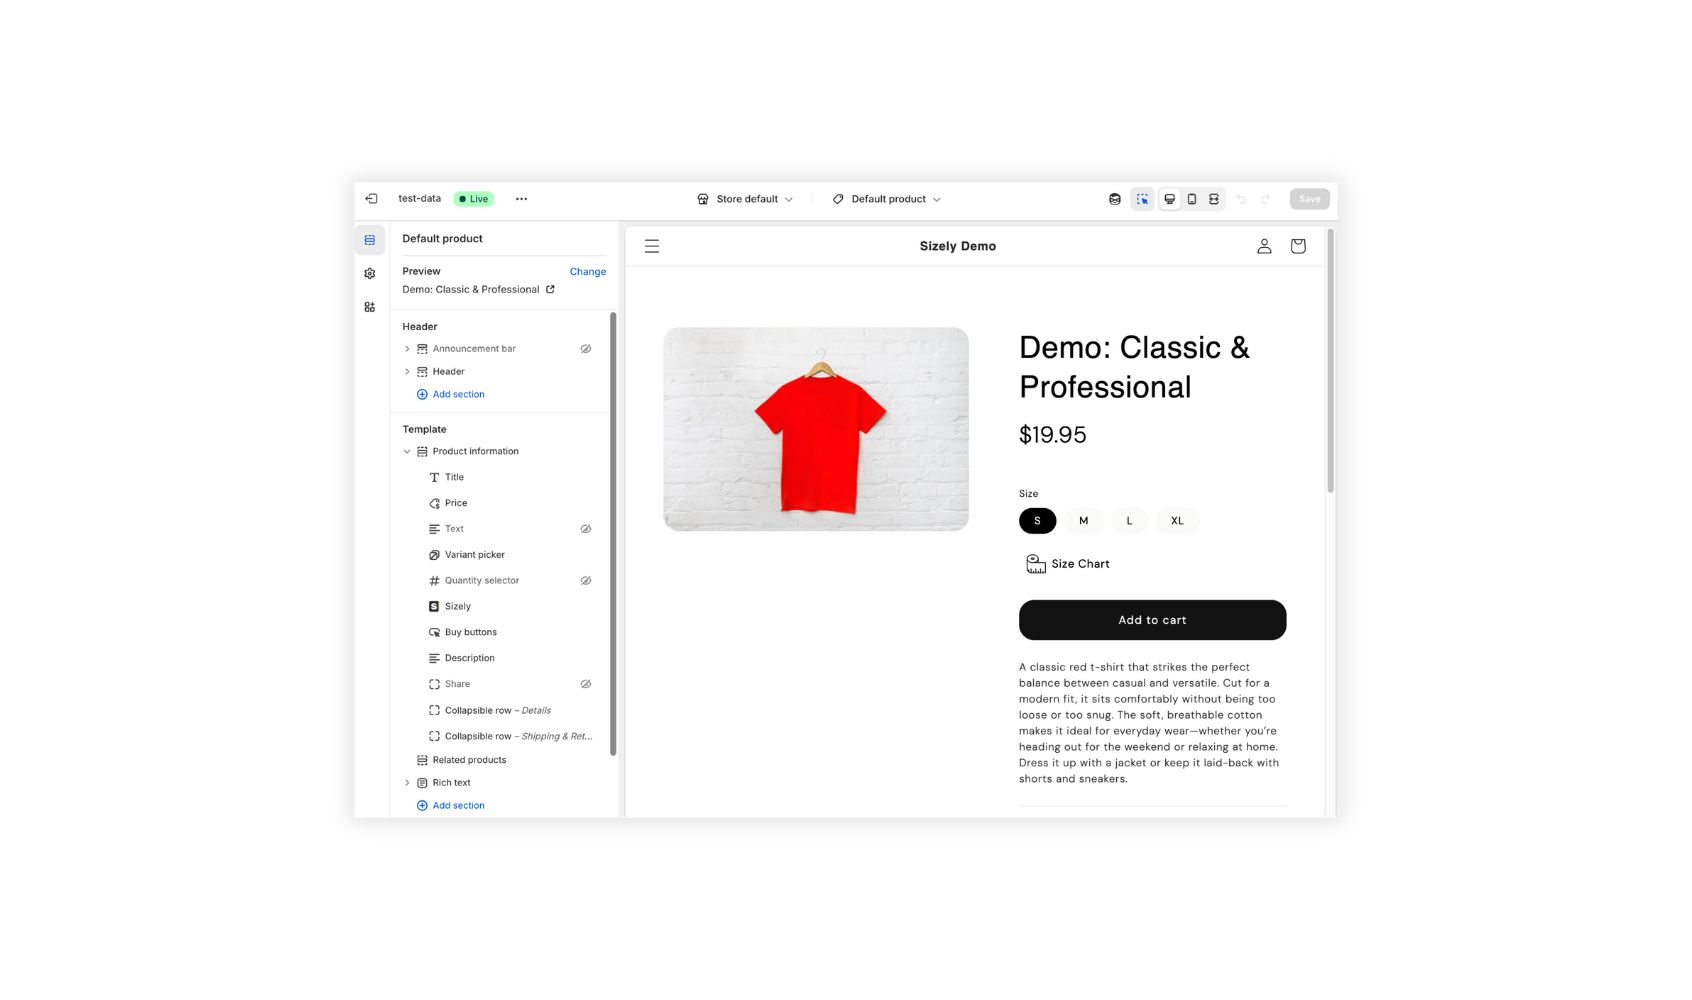
- In the Shopify theme editor, open the Product template and click Add block (+ button) → Apps → Sizely (or your chosen app).
- Place the block where you'd like the size-chart button or link to appear (e.g., below the product description in "Product Information").
- Save and preview your product page to confirm the chart displays correctly.
Pros and Cons
| Pros | Cons |
|---|---|
| No theme edits or Liquid code required | Ongoing subscription cost |
| Drag-and-drop builder with advanced modules and preview | Relies on a third-party service for uptime and feature updates |
| Bulk assignment to products, collections, types, or vendors | |
| Built-in responsive design and analytics (if provided by the app) |
5. Summary & Recommendations
Adding a size chart in Shopify helps customers choose the right size, reduces returns, and increases conversions. While there are multiple ways to implement size charts, using a dedicated app like Sizely provides the fastest, most flexible, and scalable solution.
Why Sizely Stands Out
- Drag-and-drop builder makes creating charts quick and easy.
- Eight module types let you combine text, tables, images, and more.
- Preview mode ensures charts look perfect before publishing.
- Display Settings let you assign charts to single products, collections, product types, or vendors.
- Charts can match your store's style and branding, providing a polished, professional look.
- No need to touch theme code or create hidden pages. Everything is managed from a single dashboard.
Comparison of Methods
| Method | Pros | Cons |
|---|---|---|
| Standalone Page | Free, simple | Not product-specific; customers must leave product page |
| Metafields & Theme Customization | Product-specific, flexible | Requires theme edits and hidden pages; manual linking |
| Sizely App | Fast setup, scalable, no coding, bulk assignment, responsive, brandable | Subscription cost |
Recommendations
- Most efficient for any store size: Use Sizely to create size charts in Shopify. It saves time, reduces manual work, and ensures charts are consistent across all products.
- Smaller stores with a single chart can consider a standalone page as a temporary solution.
- Stores comfortable with theme edits can use metafields, but it requires ongoing maintenance as your catalog grows.